Apex offers you various ways to navigate through an application. Tabs are commonly used, but navigation lists can also be used. I actually prefer navigation lists over tabs. With modern monitors and screen resolutions the page height is rather limited, whereas there is plenty of width. A navigation list makes better use of the abundant width and allows for more height of your active page space (for example a report- or form region).
A while ago I wrote a blog explaining how you can create dynamic navigation lists based on the apex_application_pages view. This works fine for smaller applications, but as your application grows, it’s harder to find the page that you want to go to, in the list. In this post I want to describe a solution to create navigation lists that can dynamically grow as you create new pages, but also can be ordered as to maintain lucid. I’ll also explain how to let each section of the list expand or collapse, to highlight the currently visited page.
First let’s think of what we want to accomplish. We want to end up with a list that can hold a number of pages, which can be subdivided in logical sections. We already know that we can add pages to the list by basing the list on the apex_application_pages view, where we select all the pages that have a page alias. The page alias will be used as name for the navigation list and we can include pages by setting their page alias. Apex allows you to subdivide the pages of your application in page groups. This feature can be useful for a number of things, but here we’ll will use them to create the sections for our navigation list.
You can create page groups under Utilities>Cross Page Utilities (in the right hand menu)>Page Groups. Once you’ve creates the page groups (or soon-to-be navigation list sections) that you need, you can add a page to a page group by navigating to that page, go to page attributes and select the page group under the “Name” section. You can do this for each page that you want to include. When you’re done, each page that should be displayed in the navigation list should have a proper page alias and a proper page group assigned.
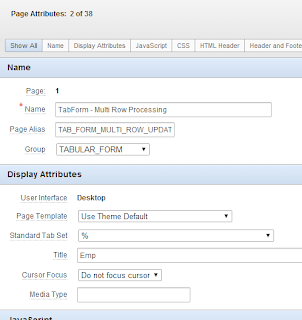
The list we are going to create will actually consist of a number of separate lists, each list representing a section of the total navigation list. So to create the navigation list, we must create a number of smaller lists. Each list will be a query on apex_application_pages view, looking for pages, within a specific page group, that have a page alias. Such a query should look like:
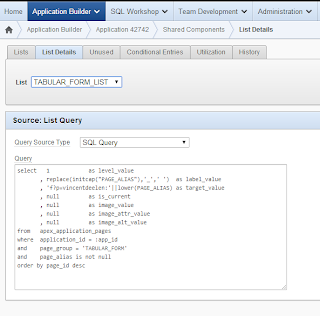
Note that this query will include all pages from the current application, that belong to page group 'TABULAR_FORM' and have a page alias. The page alias will be the name that appears in the navigation list.
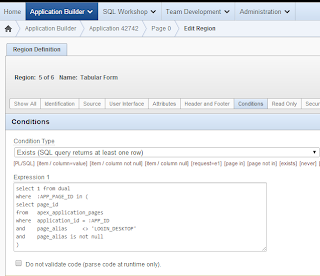
Once you have created a list for each page group/list section, we are ready to include the list in our application. We add the lists to the global page of our application (page zero in older versions of Apex). Create a new region of type “List” for each list section. Since we create these regions on the global page, they will appear in every page of the application. That might be a bit too much, so you might want to add a display condition that will ensure that the lists will only be displayed on the pages that are actually in the navigation list, i.e. the pages that have a page alias. All except for the login page of course. You can create a list region on page zero for each list section.
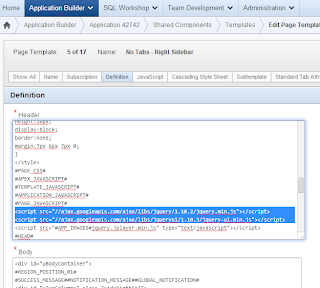
We’re halfway there. We now have a list that is subdivided into sections of pages that are somehow related. The problem is that this list can grow long and will consume a lot of space. We can create an expand- and collapse effect to each section, this will result in a compact list and will also make the whole of navigation lists look more coherent. We can create the desired effect rather easily using the jQueryUI Accordion widget. Apex relies more and more on jQuery and jQueryUI, so it makes sense to use such a widget. Unfortunately we’re a bit ahead of our time with the accordion effect, so first thing we need to do is upgrade our jQuery libraries to the latest version. You can get these libraries on the jQuery site, or on the developers section of Google. Make sure you get the minified libraries of both jQuery and jQueryUI and add them to you application. –For this you can add the links to the libraries to your page template.
The next thing we need to do is to create templates for both lists and list regions. This is due to the way the accordion widget works. The widget always looks for a header type section and treats the consecutive div element as an accordion. The default Apex templates are all use a number of layers of elements. As a result the accordion widget will not work properly. Creating templates is not very difficult, and fortunately in this case we need very basic templates.
The list template needs to look something like:
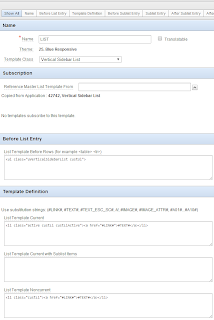
And don't forget to close the list element:

In the same style we need to create a list region template, which needs to look something like:
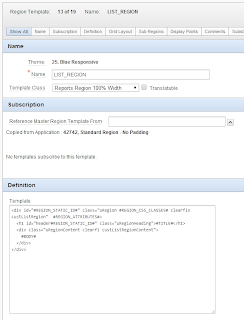
We can now change the list templates and the list region templates for all the lists on our page zero, we choose our newly created custom templates. With that set, all that's left to do is create a dynamic action that will implement the accordion widget for our list sections.
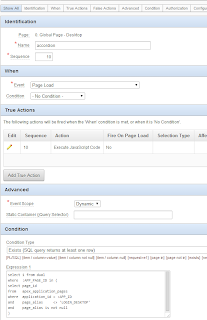
Like the list regions, make sure that you add a proper condition to the dynamic action to make sure it will only work on those pages that have a navigation list.
To the dynamic action we will add a javascript action that will implement the accordion widget.
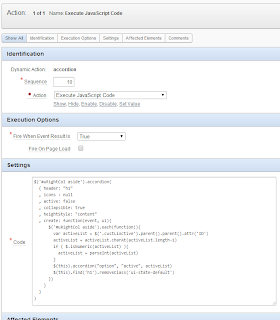
Here the create function will ensure that the list that contains the currently visited page will be opened on page load. The draggable line is optional and makes the region draggable across the screen.
This concludes the last step. We now have a navigation list that can contain a large number of pages. Pages will be grouped in sections based on page groups. We can add new pages to the navigation list be giving those page a page_alias and by assigning them to a page group. On top we can expand and collapse list sections, which results in a compact and lucid look and feel.
Following is a list of references for more in depth information on:
The navigation list as discussed is implemented in my demo application, visit it here for a working example. Good luck!

