Thursday 19 June 2014

APEX 5.0 Early Adopter 2

Recently Oracle released a new early adopter version of Apex 5.0. All workspaces from the early adopter 1 have been purged, so those who are interested need to request a new workspace.

In the ea 1 release we all ready saw some major new changes. The latest release contains some minor upgrades, most notably:

  • New Packaged Application capabilities introduced in Application Express 5.0
  • New theme features introduced in Application Express 5.0. The most important aspect being the 'Universal Theme'
  • New Websheet capabilities introduced in Application Express 5.0
You can check a list of all features -and known issues- here.

With ea2 released it looks like we're heading to an official release of Apex 5.0. That release is planned later this year, possibly late summer/early fall.
Until that time, have fun exploring the early adopter version.

Wednesday 16 April 2014

Exchange Table Data with Drag and Drop, part 2

A few months ago I wrote a blog on exchanging table data with drag and drop. This worked ok, but a few weeks ago +Till Albert pointed out a nasty bug: when you drag all employees from one table to the other, you’ll end up with an empty table. Apex will not display the table or table header, but instead displays a “No data found”-message. As a result you can no longer drag data into the empty table.

As a solution I came up with the following modifications:

  • Extend the query of each table with an empty row
  • Make all rows except the empty row draggable
  • For display enhancement hide the empty row

To start with the new table query we can add an empty row with a union:

This will always give us one empty row as a result and therefore we will always be able to display our table. Because we want to add classes to all rows except for the empty ones, it is helpful to order the table data. This enables us to easily pick out the empty row. So let’s rewrite the previous query to:

Now we always end up with our empty row on top. With this in mind we can slightly change the way we add classes to the non-empty rows:

As you can see we simply skip the first row and add the class “emp” and “ui-widget-content” to all other rows. The last thing we need to do is hide the empty table rows, we can simply do that using the “hide” operator:

With these slight modifications your tables will always be visible so you can always drag rows into it. You can check the modified working example here.

Friday 11 April 2014

Apex 4.2.5 patch release

On April 9th Oracle released a minor patch for Apex: release 4.2.5.

The new release includes "numerous bug fixes together with significant improvements and modernizations to the included Packaged Applications". Nothing shocking, but enough to keep us going untill the release of Apex 5.0, which is anticipated end of this summer.

You can download the latest release of Apex here.

Tuesday 11 March 2014

Data load for multiple tables

The data load wizard was first introduced in Apex 4.1. It lets you upload data, from let’s say a csv file, into your database. The data load capability comes with a restriction: you can upload your data only to one table.

So what if your uploaded file contains data that should be stored in more than one table? Consider the following data:

This csv file contains both data from EMP table (EMPNO, ENAME), as well as from the DEPT table (DNAME). Out of the box you will not be able to upload the csv content to the database, because you can only upload to one table a time.

As a solution you can create a view on the EMP and DEPT tables and use that view to upload your data:

Of course you can’t insert, update or delete from a view directly, but you can create instead of triggers on a view to handle such DML tasks. The instead of triggers will help us to map the content from the csv file to the appropriate tables.

Now, when we would try to upload our csv file, with the instead of trigger the EMPNO and ENAME column will be mapped to the EMP table and the DNAME column will be mapped to the DEPT table. The DEPTNO column will be inserted or updated in both the EMP and the DEPT table.

For more info on instead of triggers, read the oracle documentation
For a guide on data loading in Apex, check the builders guide

Saturday 8 February 2014

Interactive Report based on Dynamic SQL

Apex doesn't let you create an interactive report based on dynamic SQL. That is, not out-of-the-box. Apex does allow you to create an interactive report based on a function, so you could create a pipelined function based on dynamic sql, but with a pipelined function your report is predefined by the return type of your function. In this post I will demonstrate a way to create an interactive report based on dynamic SQL using Apex collections. The result is far more flexible than a report on a pipelined function. The setup will comprise of a few steps:

  1. create a function that returns a query as string
  2. create a before header process that creates a collection based on the query string
  3. create an interactive report based on the collection
  4. create page items to map collumn headers and a process to set the column headers
  5. Create display conditions for the report columns

What the function that returns the query looks like, is entirely up to your requirements. The function can be used in the before header process to create a collection. That process will look like this:

Next you need to create the interactive report. This is very simple since all data for the report is in the collection you create with the before header process.

This will create the interactive report, but this will render the column labels as C001, C002, etc. One way to create meaningful column headers is to create (hidden) page items for each column of your interactive report. You can create a process to fill the page items with the column names from your query and you can reference the column headers in your interactive report column names using the &Pxx_ITEM_NAME. notation. The procedure for within the process can look something like:

The procedure sets the session state for the page items. Note that, if you want to use dynamic sql based interactive reports on more than one page in your application, you can best create the hidden page items on your applications global page. Since you set the session state for the items, you can reference their value throughout your application. The cursor's select statement queries the column names from the “USER_TAB_COLUMNS” table. This works for all tables and user created views in your schema. However, if the result of your dynamic SQL is a complex query with joins over multiple tables, or when you don't include all columns of a table, you'll have to modify the query accordingly.

One last step we need to perform is to add display conditions to the report columns: we only want to show the columns in the interactive report, if they are needed, i.e. contain any data. You can use a simple display condition of type "Exists", in which you can use the following query:

Here you'll need to replace "XX" with the number of the column: "C001", "C002", "C003", etc. By now everthing is in place and your interactive report should be working. You can check an example in my demo application.
Good luck!

Monday 3 February 2014

Apex 5.0 Early Adopter

This weekend Oracle launched the long awaited Apex 5.0 Early Adopter release. I just signed up for a workspace on apexea.oracle.com to check out some of the new features. I must say that my first impression is very positive. If you haven't already, you can sign up here for a free workspace

The first thing that struck me was that the look and feel of the application builder has changed slightly: they've used a flat design. As a test I've exported my demo application from apex.oracle.com, and imported it in apex 5.0. In general, this worked smooth and my application worked straight away. A few things were left for adjustment: the css and JavaScript files and the images that were stored in the database were not copied along. So I started uploading of my JavaScript file. That's when I noticed the first new features: instead of uploading files to an image, css or static files folder, you can create your own folder structure. Also you can bulk upload zipped files and -something I really missed in previous Apex versions- you can download files.

Since I made my own folder structure I also needed to change some of the file references. I navigated to the first page I wanted to edit and that's when I noticed the complete new layout of the page editor. The bulk of the editor is now made up of a grid layout, which displays your page and all its regions. You can drag and drop buttons and new regions into the grid and have your page setup in no time. Once you click on a page component, all the properties of that component are displayed on the right side of the screen. You can edit them straight away. Code fields have a modal pop up box with syntax highlighting, which is a major step forward from the small text area's that I was used to.
Unfortunately the modal editor doesn't seem to be available for dynamic action code fields.

After restoring my demo application, I decided to create a new app to check some of the announced features. First thing I wanted to check was if I could get more than one interactive report on a page. You can easily create more than one IR on a page, but only one can be active at a time. I'm not sure if there is an out of the box method to switch between active IR's, or that developers will have to create their own solutions.
Another feature I found was the pivot option of Interactive Reports, which lets you create pivot tables in just a few button clicks.

All in all my first steps in Apex 5.0 are very positive. It is really a big step forward from Apex 4.2. So I guess I'll be spending the next few weeks doodling in the new Apex environment and learn all of the new features. I'll update this post with new findings occasionally, so make sure to check back regular.

UPDATE:
I've taken a look at the new theme (Theme 31) and the templates. They look really nice. Again here the template editor has syntax highlighting, which aids readability. Even better: the editors come with code completion! Next to that the edit screen is enhanced and now includes separate fields for notifications and for sub templates. Also you have separate sections for JavaScript and CSS, for which you can include your own file paths rather than the Apex files.

Tuesday 21 January 2014

Parameter input screen for Jasper Reports part 2

In my previous post I explained how you can create a parameter input form from which you can run a Jasper Report. In this post I will demonstrate how you can turn that parameter form into a modal dialog that pops up as you call it and closes once you run the report.

If you’ve followed the example in my previous post you’ll have one separate page with a dynamic pl/sql region as parameter form. To let it appear as a proper dialog, we need to us a plain template, something like “Popup” will do. For the region we’ll choose the “DIV region with ID”-template. With these templates we don’t get any of the region borders, page headers or tabs that come with other visual rich templates. For our dialog such a plain template is just what we need.

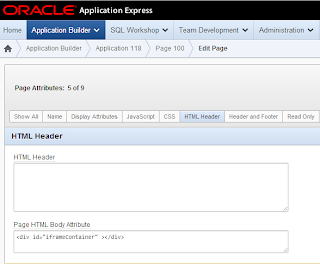
Now that the parameter form is ready, we need to go back to the page that will be calling the dialog. We’ll be calling the parameter form as an iframe. We need a HTML element to which we can append the iframe. We can create such an element in the “Page HTML Body Attribute” of the page. Here we’ll create a div to which we can bind the iframe:

Since we need to add this element to all pages that will be calling the parameter form, you should consider if you want to repeat the above step every time, or that you want to add the element to your page template.

Our next step will be the actual creation of the iframe. For this we need a dynamic action. This dynamic action needs to run when you want to start running your report, so on click of a button seems a logical choice. Make sure you set the event scope of the dynamic action to “Dynamic” to ensure you can still run the dynamic action after, let’s say a partial page refresh. The action will be a JavaScript action. The function that we are going to create will need to create an iframe with the URL of the parameter form page. We also need to pass the proper report id to the page, as the PL/SQL region will use this to evaluate what parameters need to be printed. Below function does exactly that.

By now we have a page that can append an iframe with the parameter form in it. To let it show as a modal dialog we need to add a few lines of code to the JavaScript function:

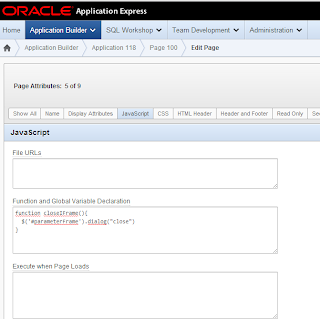
The last thing we need to do is to let the dialog close once we have run our report. This is a tricky part since we need to make sure the “close dialog” command runs after the report is opened. One way to do that is by creating a “closeIframe” function on the calling, or parent page and let the dialog call that function after the report is run. We can place the following function in our calling page under Edit Page > JavaScript > Function and Global Variable Declarations. Or again consider adding the function to your page template.

The closeIFrame function will be triggered by the parameter form page, so we need to go to that page and add some code to the dynamic action there. Place the following line of code after the window.open(url) :

That concludes the creation of the dialog popup. Following this two fold blog post you should have a full set up that lets you call a report parameter dialog from any given page. The parameters in the dialog will depend on the report id that you pass. For this you need to register your reports and their parameters, you can add them in a simple two table data model on which you can create a master-detail form. If you want to use lov’s you need to add the lov to the shared component lists of values.

Good luck!

Friday 10 January 2014

Parameter input screen for Jasper Reports

Jasper Reports is often used as print engine in APEX applications. In this series of two blog posts I will discuss a setup to pass parameters to your Jasper report. The setup will consist of:

  • a page from which the report is called,
  • a parameter dialog,
  • an url to the report

This current post will demonstrate how to create the parameter screen and how to call the report. The second post will explain how to turn the parameter page into a dialog that you can call from another page.

For the setup I assume you have Jasper Server installed. The same method works for JasperReports Engine as well, however the syntax of the URL is slightly different. To display the parameter dialog you’ll need jQuery and jQuery-UI, if you do not already have that (recent APEX version have both by default), you should download/install them and include the in your page template.

To create a parameter screen, Apex will have to know what report and what parameters the report expects. For this we’ll need to create a few tables and an apex page. In the tables we’ll store some information on the report file and the parameters each report takes, you can elaborate as much on this as you want, for example extend the model with roles authorization to handle the display of certain reports to specific user groups, etc. For here we’ll stick to a basic model follows:

Note that with this model we’ll also track what input type a parameter should be (date/lov/text) and -when applicable- what lov should be used for that parameter. The Apex screen to register the reports will be something in the line of a master-detail form to administrate what reports you want to provide in your application and what parameters each report has. The effort of registering all your reports in your application has an added benefit: you’ll be able to make an overview page listing all your reports. This is a nice feature for your end users.

Now that we can track what parameters a certain report has, we can look into building the parameter screen. This will be a pop up screen that displays the parameters for a certain report. For this, you’ll create a new page and in that page add a region of type ‘PL/SQL Dynamic Content’. For the region source we need a procedure that will generate the necessary parameters. When we know what report we want to run we can simply select the parameters that go with that report. For this we will create a cursor that selects the parameters from the parameter table. We can loop over that cursor, check what type of input field the parameter should be (date/lov/text) and create an input item accordingly. For example:

In this code you might notice two things:

  • After the cursor for loop there is one last item added. This is a lov to select the export format of the report (‘docx/xlsx/pdf/..’).
  • The cursor takes uses a parameter ‘pxx_report_id’ –where ‘xx’ should be replaced by the page number of your parameter screen. We’ll create the page item in a moment.
  • - There is a hidden item generated for the report name. This will be used in a bit when we create url to run the report.
I choose to offer end users a number of output formats and let them select one. For this you need to make a lov in Apex, under Shared Components > List of Values. This also demonstrates how you should define any other parameter as lov input item: first define a lov in Apex and then use it as input parameter in ‘apex_item.select_list_from_lov’. If you have defined your parameter as lov then you need to register the lov name in the parameters table. The lov name will then be passed from the cursor to the apex_item function in the cursor for loop.

The page item ‘pxx_report_id’ is a hidden page item that is filled by the calling page when it calls the parameter input page. We’ll create the input item and also create a button ‘Get Report’, which will run the report. The button will be of type ‘Defined by Dynamic Action’.

Our dynamic action will be a JavaScript action that runs on click of the ‘Get Report’ button. Basically the function parses all parameter data after a base URL. The base URL should point to your report server. The tricky bid is of course that the number of parameters that we need to parse depends on the report that you want to run, so we’ll need a function that loops as many times as there are input items available. Our input items all have an index number (that’s what the v_inx variable in the pl/sql code is for). So we’ll just look for any input item with an index and for as many items as we find we’ll loop. In the loop we’ll look at the current input item and take the parameter name, which is stored as id, as well as the parameter value. We paste those two at the end of the URL. Once we’ve constructed the URL we can call the report with window.open(url).

By now we have a parameter page that will render parameters for any given report. It also has a button to run the report. The reports and their parameters can be registered using a master-detail page, and we can create a page of available reports. In the following post I’ll explain how you can turn the parameter page into a modal dialog and how we can actually call that dialog from another page in your application.

For now, enjoy!