Saturday 28 September 2013

Embedding media in your APEX application

In this post I will explain various ways to incorporate audio- and or video files in your APEX application.

With HTML5, generating a media player is really easy. In fact, <audio> and <video> are elements that can be interpreted by most up to date browsers. All you need to do to create a HTML5 media player is upload a file to your file server or image directory and refer to it in a HTML region:

What’s also very interesting is, since <audio> is a native element, you can store your audio files as BLOB in the database. When you create a report on the table containing the BLOB files, you can set the download column to ‘inline’, and then you can start playing a file in your browser, straight from the database.
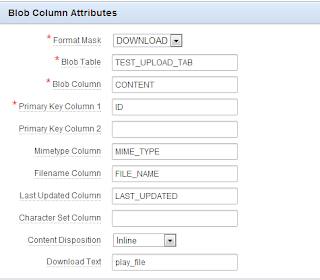
Blob Column Attributes

The downside is that your browser needs to support HTML5. If you’re not sure that your application is used only on HTML5 capable browsers, then you have to consider building your own media player. There are a number of media player plugins which are based on jQuery. One that stands out from the others is jPlayer.

JPlayer is actually a quite simple, yet very flexible plug in, written in jQuery. All you need to do is download the jPlayer library and make sure you have the jQueryUI library as well. Once you've loaded them to your file directory you can start building your own media player. For a very basic setup, you can simply create an html region and put the following code in the Region Source:

This will create the buttons for your media player. Well, maybe not the buttons, but we’ll make the list items appear as buttons later on with CSS. First let’s make our html region a player by adding some JavaScript. You can put the following code in your JavaScript file, or put it in your Region Source before the HTML. Make sure to put <script> tags around the code if you put it in your region definition:

Replace "#APP_IMAGES#Spinal Tap - The Sun Never Sweats.mp3" with your own song of choice that you’ve uploaded to your images directory. At this point your media player should be working, so now it’s time to make it look like a player as well. If you’ve not yet uploaded the CSS file from the jPlayer, now is the time. Upload it to CSS folder and make sure to place the accompanying images in the same folder as well. The images are used to show the play/pause and other buttons. If you prefer to keep your images in a separate image folder, you should edit the CSS file and edit the links to the images. If you’ve uploaded the CSS file last thing you need to do is include the file in your page by adding a link in your page html header:

Your audio player is set now. You can further customize anyway you like using CSS, jQueryUI and jPlayer functions and attributes. Now if you want to display a video in your application you can modify the audio player we’ve made, following the jPlayer guidelines. But take in consideration that video files can take up a lot of storage space (a particular problem if you use a workspace of limited size). Another way to include a video in your application is to embed it. You can upload your video to YouTube, Vimeo, or wherever you like. For here I’ll use a YouTube video.

To embed a YouTube video, choose your favourite video on YouTube and right click the player. From the menu choose the option “copy embed code”.

This code goes somewhere on your applications page, for example in the region source of an html region and you’re ready.

If you want to watch a working demo of the discussed media players, please visit my demo application.


Good luck!

Friday 13 September 2013

SEPA direct debit initiation with Oracle XML DB

SEPA Direct Debit (SDD) is a payment instrument for the SEPA (Single Euro Payment Area) that is to replace current debit methods for most European countries. As of February first, 2014, SDD will be the standard debit method for all transaction within- and cross- SEPA countries.

The standardisation of payment methods comes with drastic changes for companies that work with automated transaction orders. The transition towards SDD can be a very challenging process, especially for smaller companies that lack the in company knowledge of IT and SDD. As a board member of a sports club, I too was faced with the challenge to implement the new SDD standards. Rather than buying a software package, my wish was to incorporate the SDD in the APEX application that we were already using for our clubs’ administration.

The result had to be an XML file that can be send to our bank. The simplest way to generate the XML file from within the APEX application would be by a single button click. With that in mind I considered a number of option, for all weighing the pro’s and con’s; the main trade-off being ease of maintenance versus runtime or resource use of the file production. In the end I settled for a function that is mostly query based using the XMLelement and XMLforest functions.

First things first, the migration to SEPA and SDD is a process that should be well planned and requires quite a bit of time, mostly spend on reading all the necessary documentation on SEPA and SDD. Fortunately the rules and requirements for SDD are well documented (follow link at the bottom of the post). Once you are well acquainted with all the documentation you can start writing the function that will generate you XML file. It pays off to think and plan the design of your function, in the end it is not too difficult, but there are some things to take in consideration. For example, you must ensure that your underlying data model holds all the required data, for example:

  • SDD requires IBAN rather than old fashioned account numbers
  • SDD requires BIC (Bank Identifier Code)
  • The XML file must have separate batches for new/first time debits and existing/recurring debits

When your data model is capable of storing and providing all the necessary data, you can think about the structure of your function. The resulting XML file basically consists of one or more payment info blocks, preceded by a group header. Each Payment section consists of a number of related transactions, the corresponding group header provides a subtotal of that payment section. These blocks and headers are wrapped in a “CustomerDirectDebitInitiation” block, which in turn is wrapped in document tags that hold general information such as xml version, character set, and XML namespace. Your function should, like the resulting XML file, consist of a few sub functions that each can:

  • Collect transaction specific information and write them to a payment block
  • Calculate subtotals over related transactions
  • Wrap payment blocks and their corresponding headers
  • Return a XML file

Each transaction holds information like debtor, amount, IBAN, account name, etc. This should all be data that you can retrieve from your database. Since we need XML, you can use a number of XML DB functions in your query. For the following queries I used the EMP table and extended it with an EMP_ACOUNTS table, which looks as follows:

The query to collect all transactions for a payment section can look something like this. This query should be preceded by a heading which summarizes all payment details of the transactions. Because the data in the heading depend on the data in the payment section, it makes sense to create a function that uses the payment section query to collect transaction info, and uses that info to construct a payment header. In my case I created separate function to create the header of each payment section, and a function that can create an xml block based on a collection of transactions and a payment header.

All payment sections for the file should be bundled and preceded by a group header which summarizes a total of all transactions in the xml file. Since at this point we have all our data, a function to create a group header is not much work. For example:

I chose to let this function being called by the same function that also creates the payment sections. The result of this function is a file that holds all the data for the SDD XML file. All we need to do now is make it a XML file. For this we need to add a few tags with info on the XML version and XML namespace. For this we can use the xmlroot function from Oracle. That function adds the XML version and namespace data and returns a XML file. An example of the function can be:

The result is a XML file that you can send to your bank as SDD. Of course there is room for variation. In my case a lot of the data is fixed, such as the collection amount and frequency, or the creditor name and details. Therefore I chose to put a lot of that data in variables, but you can easily parameterize these variables. Note that not the details you need to provide in your XML file can vary and depend on the way you do your transactions (i.e. you do them yourself, or let a third party collect). Another major factor is the requirements of your bank or country. So before starting to program it is advisable to consult your bank on the data you need to provide.

All in all, making your company "SEPA proof" is something that requires carefull planning and should be well thought before starting. The way you design your program or application depends on a number of factors, including your datamodel, collection method, and bank requirements. But with these factors in mind, it is well possible to create your SDD files.

Good luck!

For a working demo of the code,have a look at my demo app.
If you want the packaged code, please contact me.
For extensive documentation on SDD check the website of the European Payments Council
For documentation on Oracle XML check the Oracle XML DB Developer’s Guide