Tuesday 21 January 2014

Parameter input screen for Jasper Reports part 2

In my previous post I explained how you can create a parameter input form from which you can run a Jasper Report. In this post I will demonstrate how you can turn that parameter form into a modal dialog that pops up as you call it and closes once you run the report.

If you’ve followed the example in my previous post you’ll have one separate page with a dynamic pl/sql region as parameter form. To let it appear as a proper dialog, we need to us a plain template, something like “Popup” will do. For the region we’ll choose the “DIV region with ID”-template. With these templates we don’t get any of the region borders, page headers or tabs that come with other visual rich templates. For our dialog such a plain template is just what we need.

Now that the parameter form is ready, we need to go back to the page that will be calling the dialog. We’ll be calling the parameter form as an iframe. We need a HTML element to which we can append the iframe. We can create such an element in the “Page HTML Body Attribute” of the page. Here we’ll create a div to which we can bind the iframe:
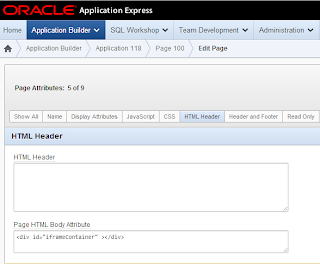
Since we need to add this element to all pages that will be calling the parameter form, you should consider if you want to repeat the above step every time, or that you want to add the element to your page template.

Our next step will be the actual creation of the iframe. For this we need a dynamic action. This dynamic action needs to run when you want to start running your report, so on click of a button seems a logical choice. Make sure you set the event scope of the dynamic action to “Dynamic” to ensure you can still run the dynamic action after, let’s say a partial page refresh. The action will be a JavaScript action. The function that we are going to create will need to create an iframe with the URL of the parameter form page. We also need to pass the proper report id to the page, as the PL/SQL region will use this to evaluate what parameters need to be printed. Below function does exactly that.

By now we have a page that can append an iframe with the parameter form in it. To let it show as a modal dialog we need to add a few lines of code to the JavaScript function:

The last thing we need to do is to let the dialog close once we have run our report. This is a tricky part since we need to make sure the “close dialog” command runs after the report is opened. One way to do that is by creating a “closeIframe” function on the calling, or parent page and let the dialog call that function after the report is run. We can place the following function in our calling page under Edit Page > JavaScript > Function and Global Variable Declarations. Or again consider adding the function to your page template.
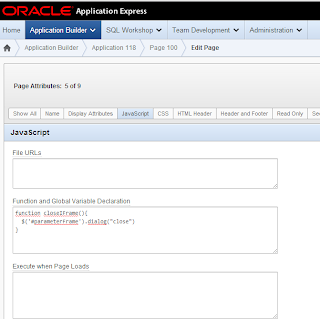
The closeIFrame function will be triggered by the parameter form page, so we need to go to that page and add some code to the dynamic action there. Place the following line of code after the window.open(url) :

That concludes the creation of the dialog popup. Following this two fold blog post you should have a full set up that lets you call a report parameter dialog from any given page. The parameters in the dialog will depend on the report id that you pass. For this you need to register your reports and their parameters, you can add them in a simple two table data model on which you can create a master-detail form. If you want to use lov’s you need to add the lov to the shared component lists of values.

Good luck!

Friday 10 January 2014

Parameter input screen for Jasper Reports

Jasper Reports is often used as print engine in APEX applications. In this series of two blog posts I will discuss a setup to pass parameters to your Jasper report. The setup will consist of:

  • a page from which the report is called,
  • a parameter dialog,
  • an url to the report

This current post will demonstrate how to create the parameter screen and how to call the report. The second post will explain how to turn the parameter page into a dialog that you can call from another page.

For the setup I assume you have Jasper Server installed. The same method works for JasperReports Engine as well, however the syntax of the URL is slightly different. To display the parameter dialog you’ll need jQuery and jQuery-UI, if you do not already have that (recent APEX version have both by default), you should download/install them and include the in your page template.

To create a parameter screen, Apex will have to know what report and what parameters the report expects. For this we’ll need to create a few tables and an apex page. In the tables we’ll store some information on the report file and the parameters each report takes, you can elaborate as much on this as you want, for example extend the model with roles authorization to handle the display of certain reports to specific user groups, etc. For here we’ll stick to a basic model follows:

Note that with this model we’ll also track what input type a parameter should be (date/lov/text) and -when applicable- what lov should be used for that parameter. The Apex screen to register the reports will be something in the line of a master-detail form to administrate what reports you want to provide in your application and what parameters each report has. The effort of registering all your reports in your application has an added benefit: you’ll be able to make an overview page listing all your reports. This is a nice feature for your end users.

Now that we can track what parameters a certain report has, we can look into building the parameter screen. This will be a pop up screen that displays the parameters for a certain report. For this, you’ll create a new page and in that page add a region of type ‘PL/SQL Dynamic Content’. For the region source we need a procedure that will generate the necessary parameters. When we know what report we want to run we can simply select the parameters that go with that report. For this we will create a cursor that selects the parameters from the parameter table. We can loop over that cursor, check what type of input field the parameter should be (date/lov/text) and create an input item accordingly. For example:

In this code you might notice two things:

  • After the cursor for loop there is one last item added. This is a lov to select the export format of the report (‘docx/xlsx/pdf/..’).
  • The cursor takes uses a parameter ‘pxx_report_id’ –where ‘xx’ should be replaced by the page number of your parameter screen. We’ll create the page item in a moment.
  • - There is a hidden item generated for the report name. This will be used in a bit when we create url to run the report.
I choose to offer end users a number of output formats and let them select one. For this you need to make a lov in Apex, under Shared Components > List of Values. This also demonstrates how you should define any other parameter as lov input item: first define a lov in Apex and then use it as input parameter in ‘apex_item.select_list_from_lov’. If you have defined your parameter as lov then you need to register the lov name in the parameters table. The lov name will then be passed from the cursor to the apex_item function in the cursor for loop.

The page item ‘pxx_report_id’ is a hidden page item that is filled by the calling page when it calls the parameter input page. We’ll create the input item and also create a button ‘Get Report’, which will run the report. The button will be of type ‘Defined by Dynamic Action’.

Our dynamic action will be a JavaScript action that runs on click of the ‘Get Report’ button. Basically the function parses all parameter data after a base URL. The base URL should point to your report server. The tricky bid is of course that the number of parameters that we need to parse depends on the report that you want to run, so we’ll need a function that loops as many times as there are input items available. Our input items all have an index number (that’s what the v_inx variable in the pl/sql code is for). So we’ll just look for any input item with an index and for as many items as we find we’ll loop. In the loop we’ll look at the current input item and take the parameter name, which is stored as id, as well as the parameter value. We paste those two at the end of the URL. Once we’ve constructed the URL we can call the report with window.open(url).

By now we have a parameter page that will render parameters for any given report. It also has a button to run the report. The reports and their parameters can be registered using a master-detail page, and we can create a page of available reports. In the following post I’ll explain how you can turn the parameter page into a modal dialog and how we can actually call that dialog from another page in your application.

For now, enjoy!